Set up a recurring sales invoice
There are three methods for creating recurring invoices, from new , copy of an existing invoice or copy from another recurring invoice.
New recurring invoice
- Go to Sales, and Sales invoices, then select the Recurring Invoices tab
- Select New Recurring Invoice.
Copy from an existing invoice
- Sales, and Sales invoices, then select the Invoices tab.
- Open the invoice you want to copy.
-
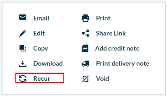
Select Recur from the actions on the right.

If you've already invoiced a customer who buys from you regularly, consider creating a recurring invoice from their last invoice. This copies all the details from their last invoice, which you can edit before saving. Use this method too if you've created the first invoice already and want to set up a recurring invoice for subsequent ones.
Enter the invoice details
- All details entered here are applied to invoices created from this recurring one.
- We won't automatically update your recurring invoice when you amend a product record or contact record, as we don't know whether you want to apply these changes.
To update information such as a price change, product description, or delivery address, edit the recurring invoice. - The invoice date is always set to the day each invoice is created.
- The Reference is applied to all invoices created from this one. Consider using a reference that makes it easy to identify them
Set up the frequency
Set the number of days, weeks or months between invoices.
For quarterly or annual invoices, set the frequency to
- Months, to recur on a particular date
- Weeks, to recur on a specific day of the week.
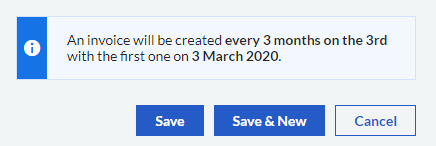
Check the schedule is correct before you save.
Starting
Choose when you want the schedule to start from. The Starting date is not necessarily the date of the first invoice, just the date you want to start running the schedule from.
- If the Starting date is today and the Frequency is also today, then an invoice will be created immediately.
-
Move the starting date if your first is scheduled to run today and you don't want to create a an invoice straight away.
You might be setting up orders today that run from a date in the future, such as the beginning of the following month. To make sure your invoices are not created early, set the starting date to the first of the next month.
-
You can't set up a recurring invoice to run from a date in the past and create invoices retrospectively.
Ending
Now you need to decide when to stop the invoices being generated.
- To create invoices perpetually, set the Ending to Never. Otherwise choose the number of invoices required or set an end date.
- Once the recurring invoice gets past it's end date, it can't be edited. If you want to set up the same recurring invoice again, because your customer has renewed their subscription for example, copy the completed one to a new recurring invoice. See Edit a recurring sales invoice.
Set up a recurring invoice with a Frequency of every 30 days to end after 3 occurrences.
This will create three separate invoices after 30, 60 and 90 days.
To help your cashflow, it's a good idea to make sure your invoices are always due to be paid on the next period.
If you set you recurring invoices to recur on the last day of the month, you may have some months where the due date falls outside of your next period.
Consider setting it up to recur around the 22nd of the month, to make sure they're always due within the following period.
Create draft invoices
Use this if you or someone else need to check the invoices before they are sent out and you don't want to update your customer accounts until they're checked. This is useful if your have a approval workflow or authorisation process
It's easier to make changes to a draft invoice and as draft invoices can't be paid, there's less chance of making errors.
- Go to Sales and Sales Invoices.
- Open the invoice from the list and make the required changes.
- Clear the Save as Draft check box.
- Choose to Save or Save and Email to send out the invoice and update your accounts.
Create invoices
Use this if you or someone else needs to check the invoices before they get sent out, or you need to send to email address other than the one set on the contact record.
Use for invoices that are not emailed or sent out immediately or to print and send in the post.
When the invoices are created they're shown on the Invoices list.
- Go to Sales and Sales Invoices.
- Open the invoice from the list and make the required changes.
- When you're ready to send them, select them from list and select Email. You can change the email address they're sent to from here.
Create and email straight away
Use this if you're happy for the invoices to created and emailed to the customer at the same time.
- When you save the recurring invoice, set the message text (and Copy To address) to be used for all invoices created from this one.
-
Invoices are always sent to the Main contact email address set on the Contact record. If this address is updated, subsequent invoices will be sent to the updated address.
If you want to send to a email address that's different to Main Contact, choose Create Invoices and then email manually from the Invoices list.
-
The subject line is automatically created and consists of the name of the company, the invoice number and value.
If you want to change the subject line from period to period, choose Create Invoices so you can amend the email details before sending.
Note: If the customer contact record doesn't have an email address, the invoices are created but not sent. Invoices that haven't been sent are shown on the Invoice list. Select them from the list to email manually.